 Bellingham Siding
 Board & Batten Siding in Puget: A Climate-First Approach
Puget sits close enough to the water that its homes deal with a specific combination of weather most siding installers never have to plan around: salt-laden air rolling off the Sound, driving rain that comes in sideways during winter fronts, and a moss and algae season that can stretch across most of the year in the shaded, damp pockets typical of Whatcom County. Board and batten siding — with its bold vertical lines and deep shadow reveals — is one of the most requested looks for homes in this area, but the look only holds up if the material and the installation are matched to what this specific stretch of coastline throws at a house.
This page is about that one job, in this one place: what a correct board and batten installation needs to account for in Puget, what we actually do differently because of it, and why a crew that already works this neighborhood brings something a traveling installer can't.
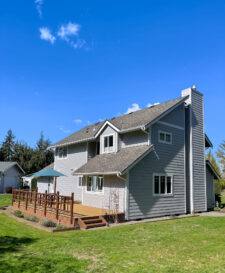
What This Climate Actually Does to a Board and Batten Wall
Salt Air and Corrosion
Board and batten relies on a lot of exposed fastener heads and metal flashing along every vertical joint, corner, and window head. Homes near the water take in a steady dose of salt-carrying moisture in the air, and that salt accelerates corrosion on the wrong fasteners and flashing metals far faster than it would a few miles inland. A board and batten job that looks fine for the first year but starts showing rust streaks or fastener bleed by year three usually traces back to hardware that wasn't specified for a coastal-influenced environment.
Driving Rain and Wind-Driven Moisture
Board and batten has more vertical seams than lap siding, and every one of those seams is a potential path for water if it isn't detailed correctly. In a storm that's coming straight down, that's rarely a problem. In wind-driven rain — which is routine in this part of Whatcom County during fall and winter systems off the Sound — water gets pushed sideways and upward into gaps that would otherwise stay dry. The batten spacing, the drainage gap behind the panel, and the flashing at every horizontal break all have to be built assuming rain won't fall straight.
Moss, Algae, and the Long Wet Season
Shaded elevations and north-facing walls in this area rarely get enough sun to dry out fully between rain events for much of the year. That keeps humidity sitting against the siding surface longer than it would in a drier climate, which is exactly the condition moss and algae need to take hold. A siding material that can't shed water quickly, or that has a surface texture that traps moisture, ends up needing regular pressure washing and treatment just to keep its finish presentable.
What a Correct Board and Batten Job Actually Involves
Board and batten looks simple — vertical panels, battens over the seams — but the details that keep it performing for decades are mostly invisible once the job is done. This is what we check and build into every installation:
- A drainage gap (rainscreen) behind the panel so any moisture that does get past the surface has somewhere to go besides the sheathing.
- Correct batten spacing and fastener pattern so the panel can expand and contract with temperature and moisture swings without cracking the finish or pulling fasteners loose.
- Z-flashing or equivalent metal flashing at every horizontal panel break and above windows and doors, sized and lapped for wind-driven rain, not just straight-down rain.
- Fasteners and flashing metals rated for a coastal-influenced, high-moisture environment rather than generic hardware.
- Proper clearance at grade and at any horizontal trim so the bottom edge of the siding isn't sitting in standing water or splash-back.
- Caulking used only where it belongs — at trim and penetrations, not as a substitute for correct flashing at seams.
Skip any one of these and the wall can still look right on installation day. The problems show up two, five, or ten winters later, usually as water staining, soft trim, or fastener failure — long after a rushed installer has moved on.
Material Choice: Why We Install Only James Hardie Fiber Cement
Board and batten is available in several materials, and each one behaves differently under the salt air, driving rain, and extended damp season typical of this area. We standardized on James Hardie fiber cement for every board and batten job we do, including here in Puget, for reasons that come down to how each material actually holds up over time rather than how it looks on day one.
| Material | How It Handles This Climate | Long-Term Trade-Off |
|---|---|---|
| James Hardie fiber cement | Non-combustible, engineered moisture resistance, factory-applied ColorPlus finish resists the fading and staining that come with a long wet season | Higher upfront material cost than vinyl; requires correct installation to perform to spec |
| Vinyl board and batten | Won't rot, but can warp or crack in temperature swings and doesn't hold color well under constant UV and moisture cycling | Seams and battens are often just decorative overlays rather than a true drainage-detailed assembly |
| LP SmartSide (engineered wood) | Treated to resist moisture, but it's still a wood-based product and depends heavily on caulking and paint maintenance in a wet climate | Edge swelling and finish upkeep become an ongoing cost if maintenance schedules slip |
| Cedar or primed spruce | Traditional look, but natural wood is the most vulnerable of the group to the moss, algae, and moisture cycling common here | Needs the most frequent refinishing and is the most sensitive to installation shortcuts |
Every material in that table has a legitimate use case somewhere. What we've found, doing this work in a wet coastal climate specifically, is that fiber cement gives the most consistent long-term result with the least maintenance burden on the homeowner — which is why it's the only product we put on a house.
How We Approach a Board and Batten Project in Puget
Because this is a specific, small community with a shared set of exposure conditions — proximity to the water, tree cover on many lots, and the same weather systems moving through — our process here follows the same steps we'd use anywhere, but with the details tuned to what actually shows up on homes in this area:
- On-site assessment. We look at sun exposure per elevation, existing moisture damage, current drainage at grade, and how exposed the house is to wind off the water.
- Moisture check before tear-off. Before removing existing siding, we check the sheathing condition, since a wet climate means hidden water damage is more common than in drier regions.
- Rainscreen and flashing plan. We map out drainage gap, flashing details, and fastener spec for the specific elevations and exposure of that house, not a one-size approach.
- Installation to Hardie's fastening and clearance specifications. This is what keeps the manufacturer warranty valid and is also, frankly, what keeps the wall dry.
- Final walk-through. We check reveal consistency, fastener pattern, and flashing coverage before calling the job done.
None of these steps change because we're in Puget specifically — but knowing, from repeated work in this area, which elevations tend to hold moisture longest and where wind-driven rain hits hardest means less guesswork and fewer surprises once the old siding comes off.
Why Hiring a Crew That Already Works This Area Matters
A siding crew that has worked Puget and the surrounding Bellingham area repeatedly has already seen how houses in this specific setting age — which elevations tend to stay damp longest, which grading patterns cause splash-back at the base of a wall, and what Whatcom County's permitting and inspection process expects for exterior work. That's not a substitute for a proper on-site assessment of your house, but it does mean fewer avoidable surprises and a crew that isn't learning the local weather pattern on your project.
It also matters for warranty follow-through. A crew based in the area is available if a flashing detail needs a look years down the road, rather than a traveling installer who's long gone by the time a problem would show up.
Keeping Board and Batten Looking Right After Installation
Correct installation solves most of the long-term problems, but a wet, moss-prone climate still calls for a little upkeep. This is a reasonable maintenance checklist for board and batten siding in this area:
- Rinse the siding surface once or twice a year to clear pollen, salt residue, and early moss growth before it takes hold.
- Keep gutters clear so overflow isn't running down the wall face during heavy rain events.
- Trim back vegetation and tree branches that keep shaded elevations from drying out between storms.
- Do a visual check of caulking at trim and penetrations every year or two — caulk is a maintenance item, flashing is not.
- Watch for any staining or soft spots near the base of the wall, which is usually the first sign of a grading or drainage issue rather than a siding failure.
What Affects the Cost of a Board and Batten Project Here
Every house is different, but a few factors consistently move the price of a board and batten job in this area up or down: total wall square footage, whether existing siding needs to be torn off versus overlaid (tear-off is standard practice with fiber cement, since it lets us inspect and fix the sheathing underneath), how much trim and window/door detailing is involved, and how accessible the house is for scaffolding or lift equipment on tighter lots. We'll walk through all of that specifically for your house rather than quoting a number in the abstract — every board and batten estimate we give is based on an actual look at the property.
If you're planning a board and batten project in Puget or elsewhere in the Bellingham area, we're happy to come take a look and put together a straightforward, no-pressure estimate — no hard sell, just an honest read on what your house needs.